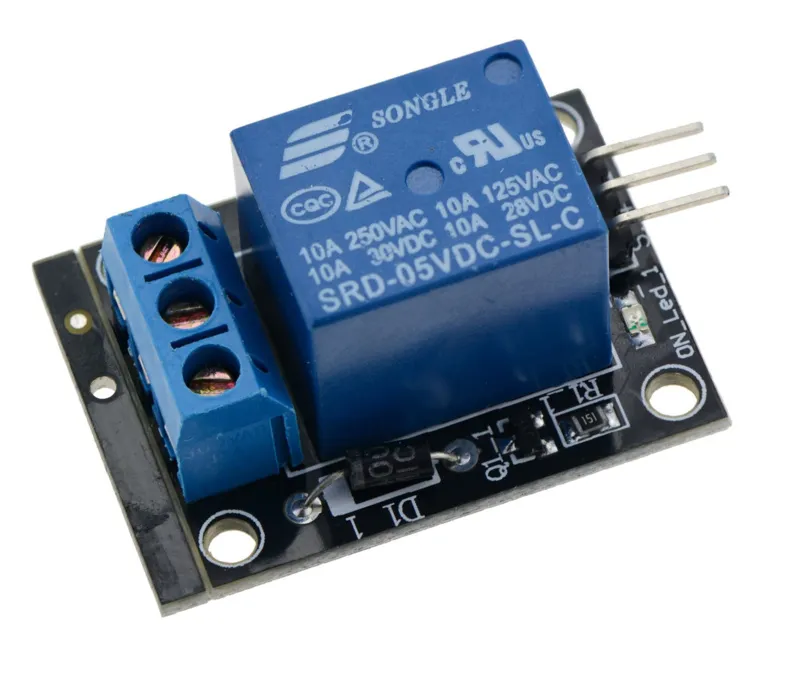
SKU: OT961-C105 Artikelnummer: YP924 EAN: 4639867568390

Suchbegriffe: relais 5v, 5v relais, relay 5v, 5v relay, relais hoog, relais high, relay high, blauwe relais, relais blauw, relais 250v, relais 220v, relais voor arduino, arduino relais, relais breadboard
Abmessungen
Länge: 3,3cm
Breite: 2,6cm
Höhe: 1,7cm
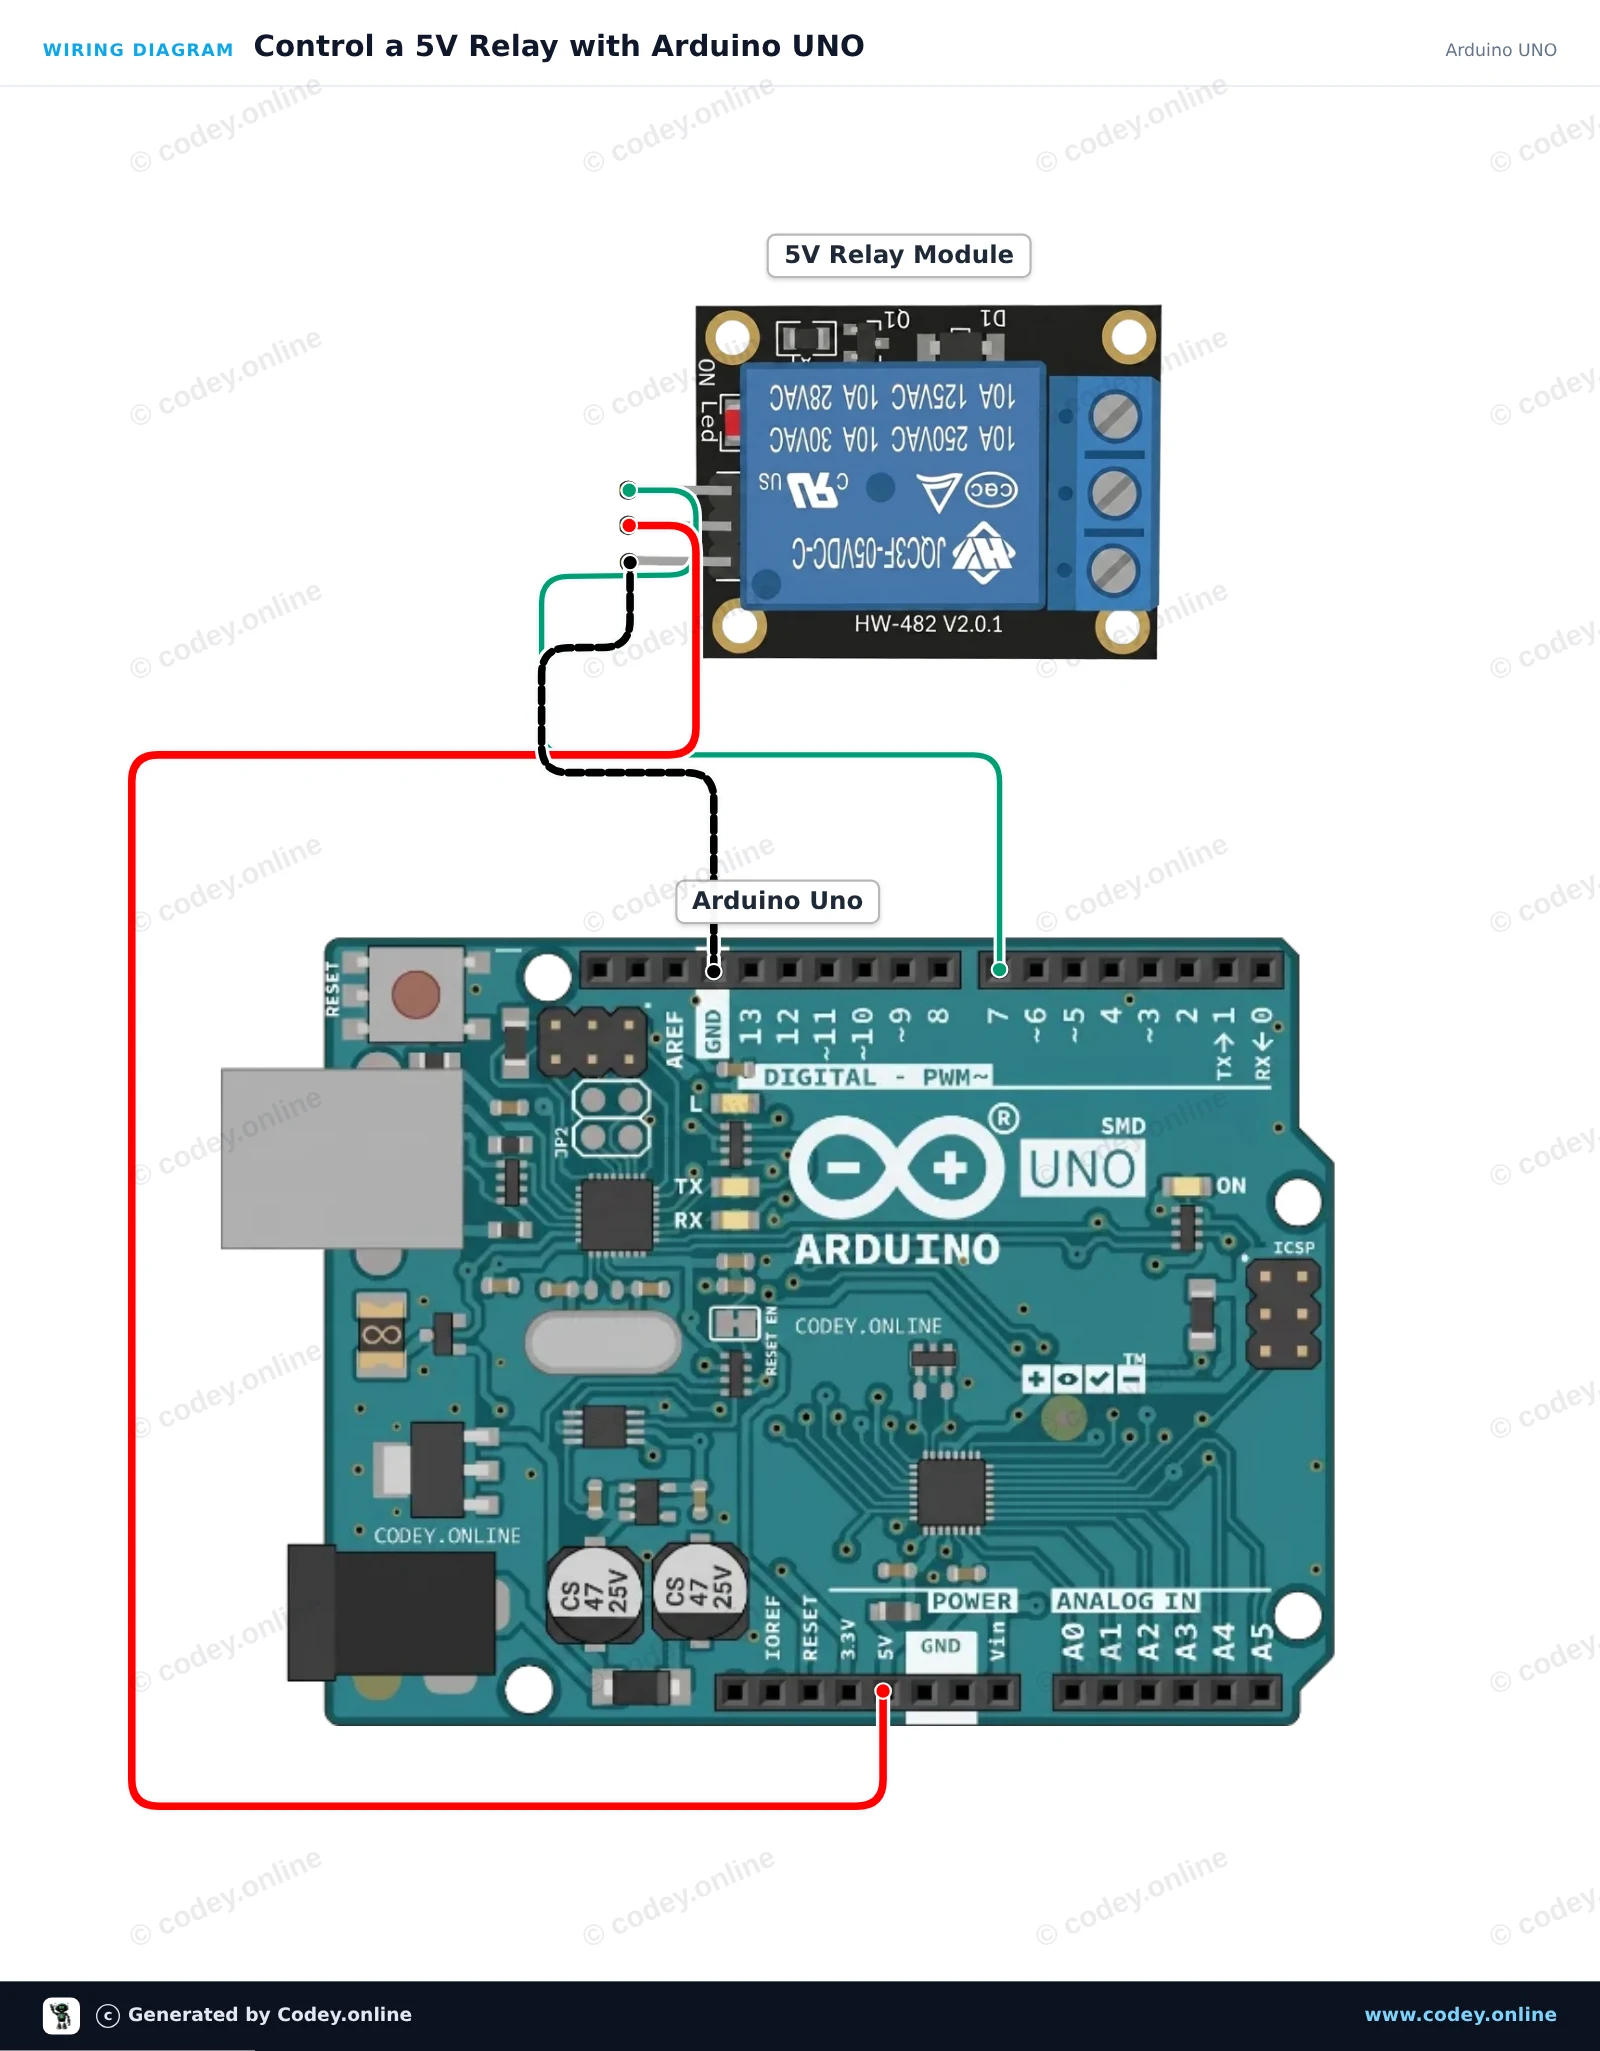
So schließt du den Relais Modul 5v für Arduino an einen Arduino UNO oder ESP32 an, mit einem Beispiel-Sketch, den du direkt hochladen kannst.
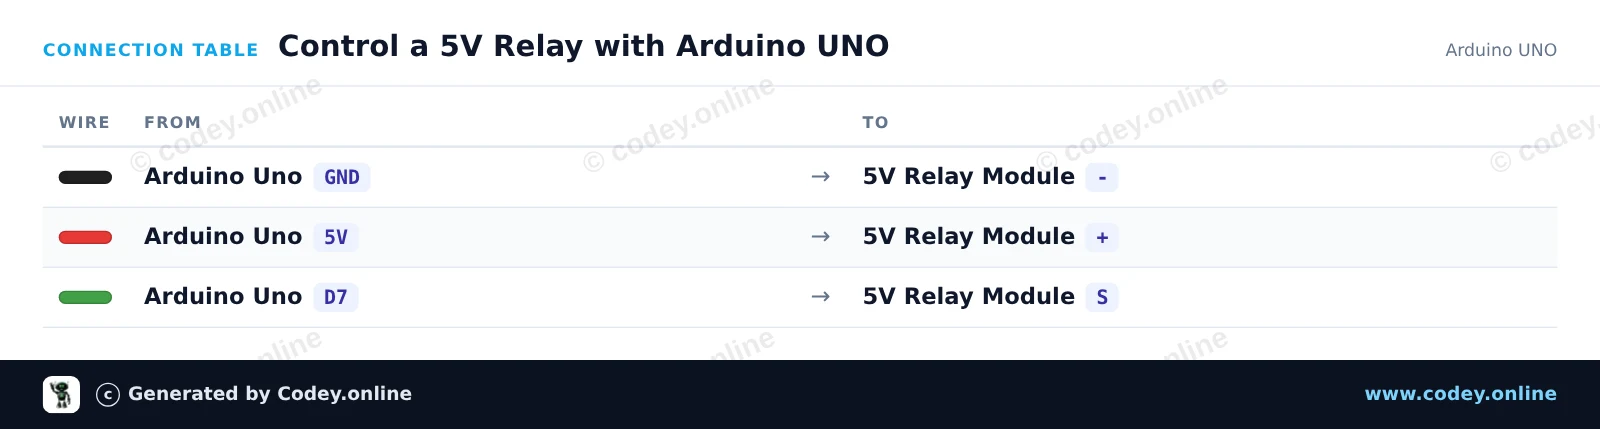
Dieses Projekt zeigt, wie man ein 5V-Relaismodul mit einem Arduino UNO steuert. Der Sketch schaltet das Relais alle zwei Sekunden EIN und AUS und gibt den Status im Serial Monitor aus. Bei jedem Zustandswechsel hört man ein hörbares Klicken des Relais.
/*
 * ==================================================================
 *  Generated by Codey.online  —  https://www.codey.online
 * ==================================================================
 *  Project   : Control a 5V Relay with Arduino UNO
 *  Board     : Arduino UNO (arduino:avr:uno)
 *  Parts     : Relay Module 5V
 *  Libraries : none (built-in)
 *
 *  Codey Online is an AI-powered browser IDE for Arduino and ESP32.
 *  Describe your project and Codey writes the code, draws the wiring
 *  diagram and uploads it to your board, straight from the browser.
 *  This code is free to use, modify and share, without warranty.
 * ==================================================================
 */

// 5V Relay Module Example
const int RELAY_PIN = 7;

void setup() {
  pinMode(RELAY_PIN, OUTPUT);
  Serial.begin(115200);
  Serial.println(F("Relay module demo started."));
}

void loop() {
  // Turn relay ON
  digitalWrite(RELAY_PIN, HIGH);
  Serial.println(F("Relay: ON"));
  delay(2000);

  // Turn relay OFF
  digitalWrite(RELAY_PIN, LOW);
  Serial.println(F("Relay: OFF"));
  delay(2000);
}Wiring diagram and example code generated by Codey.online — https://www.codey.online
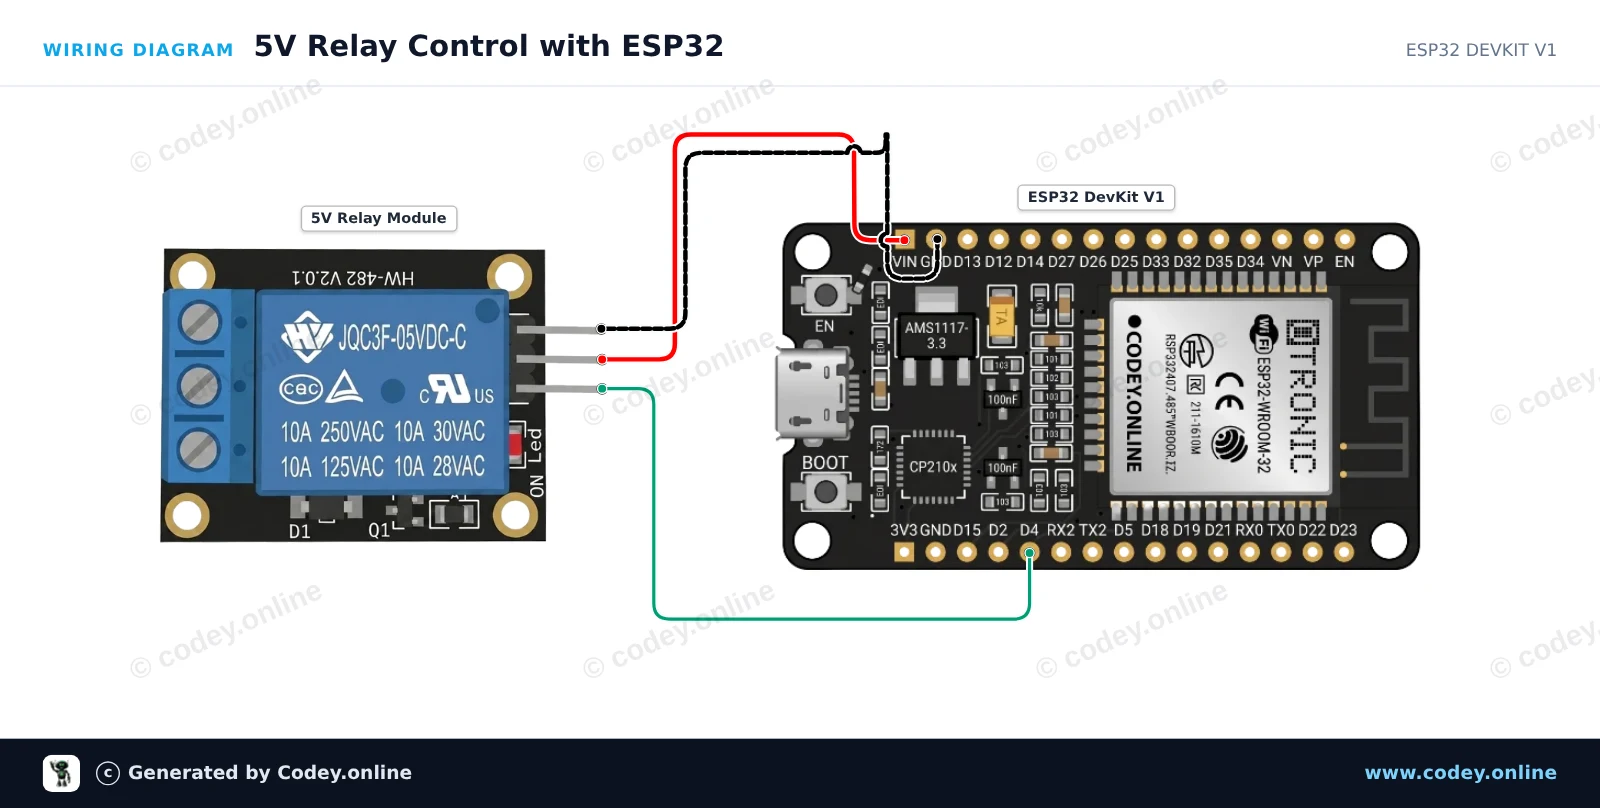
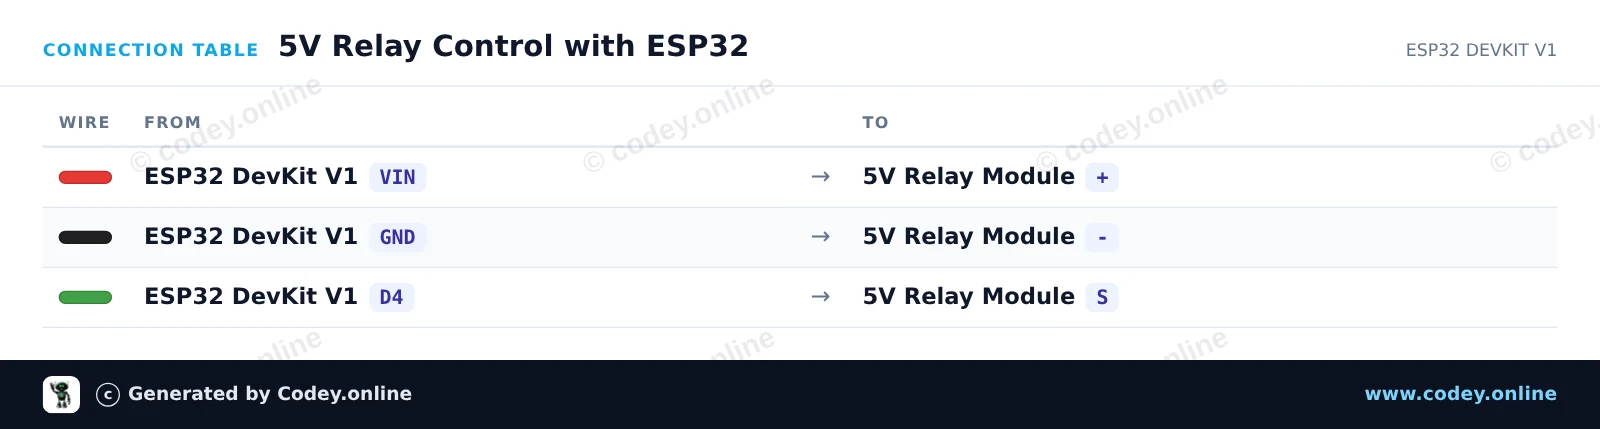
Dieses Projekt zeigt, wie man ein 5V-Relaismodul mit einem ESP32 ansteuert. Das Relais schaltet alle zwei Sekunden EIN und AUS und gibt seinen Status auf dem Serial Monitor aus. Das Relais wird direkt über den ESP32 VIN-Pin (5V von USB) versorgt und über GPIO 4 ausgelöst.
/*
 * ==================================================================
 *  Generated by Codey.online  —  https://www.codey.online
 * ==================================================================
 *  Project   : 5V Relay Control with ESP32
 *  Board     : ESP32 DEVKIT V1 (esp32:esp32:esp32doit-devkit-v1)
 *  Parts     : Relay Module 5V
 *  Libraries : none (built-in)
 *
 *  Codey Online is an AI-powered browser IDE for Arduino and ESP32.
 *  Describe your project and Codey writes the code, draws the wiring
 *  diagram and uploads it to your board, straight from the browser.
 *  This code is free to use, modify and share, without warranty.
 * ==================================================================
 */

// 5V Relay Control Example for ESP32
const int RELAY_PIN = 4;

void setup() {
  Serial.begin(115200);
  pinMode(RELAY_PIN, OUTPUT);
  digitalWrite(RELAY_PIN, LOW);
  Serial.println("Relay control initialized.");
}

void loop() {
  // Turn relay ON (Active HIGH for standard modules)
  Serial.println("Relay: ON");
  digitalWrite(RELAY_PIN, HIGH);
  delay(2000);

  // Turn relay OFF
  Serial.println("Relay: OFF");
  digitalWrite(RELAY_PIN, LOW);
  delay(2000);
}Wiring diagram and example code generated by Codey.online — https://www.codey.online





 English
  Nederlands
  Frans
Frans  Italiano
  Español
  Suomi
Suomi  Polski
  Dansk
Dansk  Ελληνικά
  Български
  Čeština
  Hrvatski
  Aileen